How to create a Grinch Nail with Magpie
- Posted on
- 0
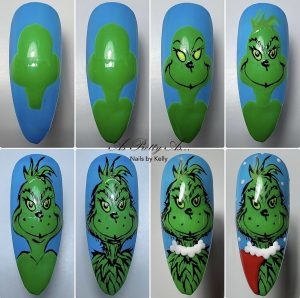
Kelly Scothorn @asprettyas_nailsbykelly shares the steps to her fantastic grinch design below
1. Apply your chosen base colour. Once cured, wipe away the inhibition layer. Using GREEN GEL PAINT, create the Grinch’s head and neck on the top half of the nail, ensuring you leave enough space at the top for the Grinch’s hair. Once you are happy with the shape, cure.
2. Using a fine DETAILER BRUSH, draw in the shoulders by bringing curved lines from the base of the neck to the sides of the nail. Infill the shape and cure for 60 seconds.
3. Add small yellow dots using a DOTTING TOOL for the eyes, and flash cure. Using a striper brush, carefully draw the outline of the eyes with BLACK GEL PAINT. Add lines for the eyebrows, nose and mouth. Flash cure.
4. Using a small DETAILER BRUSH, add fine lines into the eyebrows and add pupils into the eyes. Then, apply GREEN GEL PAINT to the top of the Grinch’s head, bringing the lines you create to a sharp point. Fully cure.
5. Carefully outline the Grinch using either a striper or DETAILER BRUSH. Flash cure as you go along. Using either the very tip of a detailer brush or a DOTTING TOOL, apply the freckles, chin and V shape under his neck. Cure.
6. Apply tiny fine lines around the outer edge of the Grinch’s body, and add numerous V shapes on his shoulders and chest. This will create a fur-like effect. Add frown lines with the BLACK GEL PAINT, and fully cure for 60 seconds.
7. Using white gel paint and a DOTTING TOOL, add small dots to build up the fluffy scarf. Cure for 60 seconds.
8. Apply RED GEL PAINT with a DETAILER BRUSH to create the cape. Add white dots in the background with the small end of a DOTTING TOOL to create the snow. Once happy, give the nail a full cure and apply your chosen top coat.
Comments
Be the first to comment...